Wednesday, 27 July 2016

|| हरि ॐ ||
मदर चण्डिका स्पिरिच्यूअल करन्सी सिस्टीममधील सेवेबाबत सुचना

परमपूज्य सद्गुरु श्री अनिरूद्ध बापूंनी मदर चंण्डिका स्पिरिच्यूअल करन्सी गेल्यावर्षापासून सुरु केली त्यानुसार विविध सेवा करुन त्या बदल्यात तुळशीपत्र मिळवून अनेक श्रद्धावान त्याचा लाभ घेतच आहेत. या सिस्टीममधे पुढील सेवा सेवा नव्याने सामाविष्ट करण्यात आलेली आहे, त्याची माहिती पुढीलप्रमाणे:

पत्री सेवा:  
ही पुर्णपणे नविन सेवा उत्सव ह्या मेन प्रोजेक्ट मधील पत्री सेवा सब प्रोजेक्ट अंतर्गत अंतर्गत तयार करण्यात आलेली आहे. ह्या अंतर्गत कोणकोणत्या सेवा व त्या सेवेला किती तुळशीपत्र मिळणार ह्याची सविस्तर यादी खालीलप्रमाणे:

Sr. No.
Seva Description
Unit of Measure
Tulsipatra
Seva Creation
Seva Recommendation
Period of Seva
1
Preparing Mala of Ashoka Patri
2 Number of Mala (5 Feet)
3
Head Office
Head Office
Activity wise
2
Patri cutting from tree
2 Hours of Attendance
6
Head Office
Head Office
Activity wise
3
Helping hand for patri cleaning & preparation
2 Hours of Attendance
3
Head Office
Head Office
Activity wise
4
Banana tree cutting & transport up to shree harigurugram
1 Number of Trip
6
Head Office
Head Office
Activity wise

ह्या सर्व सेवेंचा तपशिल मदर चंण्डिका स्पिरिच्यूअल करन्सी सिस्टीममध्ये ‘Currency View’ (करन्सि व्ह्यु) मधील ‘View Tulsipatra Allocations’ (व्ह्यु तुलसीपत्र अलोकेशन्स) मध्ये आपण पाहू शकता. ह्या बाबात आपली अजुन काही शंका किंवा माहिती पाहिजे असल्यास आपण ह्या सिस्टीमच्या "हेल्पलाईन" मधिल श्रद्धावानांशी अथवा आपल्या केंद्रीय केंद्र संपर्क समितीशी संपर्क साधावा.

लीलाधर कुक्यान,

उप मुख्य कार्यकारी अधिकारी

Wednesday, 27 January 2016

LOG IN

Welcome to the ‘Mother Chandika Spiritual Currency System’ !

To begin we have to type the URL "www.chandikaspiritualcurrency. com'' (address of the site) in the address bar of the browser. 
You will see the below landing Page.

To join the Chandika Spiritual Currency, one has to first register. For registration, you require an email id. In order to register, click on the “JOIN” button as shown by the arrow and fill up the registration form given below. In order to be the part of this website, you need to fill this registration form.
 After filling up the registry form, you will receive an e-mail from the Chandika Spiritual Currency on the e-mail id that you have used to register. In the email received from Chandika Spiritual Currency, you will receive a password. Next time you visit the website, you may log in using this particular password. Later on, you can change this password too.

1) LOG IN

On homepage, click on the ‘Log In’ button. A new window will open. In ROW 1, type your e-mail id. In column (ROW) 2, type your password, and then click on the “LOGIN” button as indicated by the arrow.
When you log in you will see the screen given below. On this screen on the right hand side you will see No.1 MY PROFILE. No.2, CHANGE PASSWORD, No 3, LOG OUT and No.4 HELP.
To see your own profile, click on MY PROFILE (No.1). Here you will be able to see all the information you filled in the register form. If you wish you may edit your information in the given profile. To do so, click on the “EDIT MY PROFILE” button as indicated by the arrow. You can even now change your email address.

2) CHANGE PASSWORD

If you wish to change the password given by Chandika Currency application you may do so by clicking on “CHANGE PASSWORD” (No.2).
** WARNING: TO ENSURE SAFETY & SECURITY OF YOUR ACCOUNT, DO NOT SHARE YOUR PASSWORD and OPERATE JOINTLY WITH ANYONE.
Information on No.5 (REQUEST), No.6 (CURRENCY VIEW), and No.7 (WORK FLOW) has been explained in the next documents.


3) FORGOT PASSWORD

In case you have forgotten your account password, the same can be reset by using ‘Forgot Password’ link in the ‘Login’ box.
After typing your email address, select your date of birth and click submit.  You will immediately receive a new password in your email inbox. Then by using this new password you can login to the system and later change that password to the one you wish to keep.
4) HELP MENU

If you have any doubt or need more information, you can click on Help.  You can also view currency denominations and all the notifications about this system on this page.

5) LOG OUT

After you are done with your work with this website, click ‘Logout’. Please note that this is indeed important.  


Hari Om       Shreeram       Ambadnya


Tuesday, 26 January 2016

SEVA CREATION

You will be able to see ‘SEVA CREATION’ option on your screen only if you have been authorized to do so. Currently Upasana Kendra Pramukh / Uppramukh Sevaks and different committee members of the organization have been given access rights of seva creation.

To create New Seva, Click on Request button on the left side of the screen below - No.5 as shown below. Then you click on No.5 B “NEW SEVA” button.


When you click on NEW SEVA, you will see a screen showing BHAKTI SEVA REQUEST (No. 5B1). Click on the circled word, ‘ADD NEW REQUEST’.


Now you will get to see below screen.


1) Now you may select the MAIN PROJECT, SUB PROJECT OR BHAKTI SEVA TASK for the seva which you require to create.
2) Then select the Upasana Centre through which this seva will be performed.
3) Select ‘Initiated by’ option to decide whether the seva is performed by an Upasana Center or Purushartha Mandalam Kalash.
4) It’s important to mention the address of the seva venue.
5) It is mandatory to state the time duration chosen to do the bhakti seva and the date of commencement & completion of the seva.
6) Then, for a particular seva you have to select the seva claim coordinator (seva claim recommender) and seva claim approver who would recommend and approve the currency claims after approval of seva. For this click on the links, ‘ADD CO-ORDINATOR’ / ‘CLAIM APPROVER’. You can appoint more than one seva claim recommender / seva claim coordinator for the seva you are creating.
7) You will get to view number of tulsipatras allotted to selected seva when you click on the link named ‘click here to view tulsipatra allocations for selected seva’ provided at the end of screen.

Let us now understand how to add seva claim coordinators. (ADD COORDINATOR)
1) Here, you need to search the user of chandika currency system.  The one you choose as a Seva Co-ordinator has to be a USER of Chandika Currency System.
If you want to nominate any Shraddhavan as a co-ordinator, you may search for his/her name, surname, Upasana Centre, e-mail address, and the designation / user type of the Shraddhavan by clicking on USER TYPE (No. 5B3)
For Example: A search for a Shraddhavan named Nandan Bhalwankar, has been shown for SEARCH with rows for his name and surname.


After filling in the required option, click on the circled button No.1. Search result will appear below. List (No.5B4) will be seen. The list will first show you the name, then the surname and e-mail id. You may check on checkbox present in this row to select the Shraddhavan as co ordinator. When you are done with selection, click on the circled button No.2 that says ADD CO-ORDINATOR. This will take you back to the previous window.
It will show Nandan Bhalwankar’s name as the chosen Seva Co-ordinator. You may choose multiple seva coordinators in the similar way. You also have the option to remove a co-ordinator. (No. 5B5)


This Co-ordinator will be your Claim Recommender at the first level. Then comes the option for the Seva Approvers. Seva Approver is your second level of Claim Approver. The Tulsipatra approved by the Co-ordinator will go to Claim Approver for final approval. We have to select A SEVA APPROVER in the same manner as Co-ordinator.
In the window below, Mr. Nikhil Bhalwankar has been chosen as the seva approver (No. 5B6)


Once again you will see the new bhakti seva submit screen. There you will see that Nikhil Bhalwankar has been chosen as seva approver (No. 5B7).


Then click on the button that says ‘SUBMIT’.Now your bhakti-seva request would have been sent for further recommendation and approval. Now you would again get to see ‘Bhakti-seva request’ page. (No. 5B-1)


Here, in this table, you will see your new seva request and it’s status will be shown as pending.
This seva request will go to-Seva Recommender and then for final approval to CEO. Till the time approval for seva request is not obtained, the status will be shown as “Pending”. First level seva approval is known as ‘Recommendation’. After recommendation, once the seva is approved the status will be shown as “Approved”. This seva can also be cancelled or rejected. Cancelled seva cannot be resubmitted for approval. 


Hari Om       Shreeram       Ambadnya

Monday, 25 January 2016

SEVA RECOMMENDATION

After creating Seva Request in the system, it will be sent to the Seva Recommender for approval at the first level. If you have been authorized for seva recommendation, then you will be able to see a chart that says “WORK FLOW “(No.7) and the option that says “RECOMMEND SEVA REQUEST” (NO.7A) on your screen.


Example: If one Pramukh Sevak of a particular upasana center has initiated a Seva Request then other Pramukh Sevak of that centre may recommend that Seva.

When you click on “RECOMMEND SEVA REQUEST”, you will see the following screen.


Here you have been given 3 filters to search for Seva. UPASANA KENDRA , SEVA STATUS and MAIN PROJECT.

1) For Pramukh Sevaks:
In order to recommend sevas of your upasana center created by another Pramukh Sevak from the same upasana center, put the upasana center name in Upasana Center filter. You can also filter this list by Main Project name.


2) For Committee members:
These committee members associated to main projects can filter the pending seva list by using Main project filter and view the pending sevas of upasana centers. For example, Eco-friendly Ganesh project committee members can select ‘Eco-friendly Ganpati’ from Main Project and view the list of pending sevas created by upasana centers. Then they can recommend those.
With a single left click, select the seva you wish to recommend ( No. 7 A3) Then click on the circled box RECOMMEND REQUEST (No. 7A3).


You will be able to recommend this seva by clicking on “RECOMMEND REQUEST” button marked in a circle. If you wish to make some comments or give suggestions, you may do so in the Comment Box. (No. 7A4) You will then see another window.


Upasana centers need to take approval via email from CCCC before doing some sevas. For such sevas, after their actual completion at the kendras, it is necessary for upasana center pramukh sevaks to mention CCCC approval date in this comment box while recommending the sevas.
After seva recommendation, you will receive following message.


In this window you will see a message” YOUR SEVA RECOMMENDATION has been accepted and sent for final approval to Level 2”. On closing the window you will go back to the BHAKTI SEVA REQUEST recommendation page. Here you will be able to see the Sevas you had recommended (No. 7A5) after selecting ‘Recommended’ as status from dropdown.


In the right hand corner you will see a Menu –“APPROVAL STATUS”. You will see options of PENDING, RECOMMENDED,APPROVED,REJECTED &CANCELLED. With the help of these you can find out the status of each seva.

If you select any seva from this given list, then along with Recommend Requestyou will get 4 other options. They are as follows:
Option No.1- View details- Here you will find details of the seva you have selected.
Option No. 2- Edit Request – You may edit any of seva details before recommendation. Also, if your seva gets rejected due to some mentioned reason, then you can correct its details before resubmitting with this option.
Option No. 3 – Reject Request - With this option you may reject any request made earlier mentioning reason and resend a new seva request.
Option No. 4 – Cancel Request - If you wish to cancel this seva request, you can use this option.


Hari Om       Shreeram       Ambadnya

Sunday, 24 January 2016

SEVA APPROVAL
The one who has the authority to approve the seva will be able to see the “WORK FLOW “(No. 7) and the option of SEVA APPROVE (No. 7B). Only the CEOs of our Sanstha have the authority of approving Seva. When you click on this option (No. 7B), you will be able to see the screen showing BHAKTI SEVA REQUEST.


In this (No.7 B1) you will first see the list of pending recommended sevas of level 1.


You can make use of Upasana Center and Main Project filter to filter the sevas accordingly.


Select any Seva you wish to approve from the suggested sevas with a single left click and then click on the APPROVE REQUEST (No. 7B3) marked in the circle. Here you may even reject or cancel a seva. Then another window will appear.


Here you have to approve request by clicking on the encircled box. If you wish to give any comments you may do so in the COMMENT box (No. 7B4).
Another information window will then open stating you have now successfully approved seva.


You will be returned to Bhakti Seva request screen. Here choose APPROVED OPTION (No. 7 B 5). You will see a list of approved sevas (No. 7B6). If you wish to see details click on VIEW DETAILS encircled button. A new window will open.
There you will be able to see the complete information, namely, kind of seva, coordinator, claim approver and other information.


Edit Approved Bhakti-seva task:
If you want to add seva claim coordinators or seva claim approvers after the approval of seva, you can do so using above mentioned button. Also, if any approved seva does not have any claims, then that can be rejected.  


Hari Om      Shreeram      Ambadnya

Saturday, 23 January 2016

CURRENCY CLAIM AND LOGOUT

To claim TULSIPATRAS for Seva or Bhakti performed, we are supposed to put in a request in the Requests -> Currency Credit claim.


On the left hand side of the page you will be able to see REQUESTS (No. 5), click on that to find the option CURRENCY CREDIT CLAIM (No. 5A).

On clicking CURRENCY CREDIT CLAIM, the window seen below will appear. So far since you have not claimed any single currency, here you will see message saying “no record found”. To claim your currency, click on ADD NEW CLAIM button as shown encircled (No. 5A1).


When you click on ADD NEW CLAIM, a window showing ADD NEW CURRENCY CLAIM will pop up. List of sevas has already been registered uploaded in the system. You have to choose the seva that you have done performed from the given list.


Click on SELECT SEVA (No. 5A2). Another screen will show up.


Now choose the main project under which the seva is performed by clicking on MAIN PROJECT For example, if you may have selected AADM as main projects, then you are required to select Sub-Project under it. Example, under AADM you choose CROWD MANAGEMENT as SUB PROJECT.
Now select the bhakti-seva you have performed from the BHAKTI SEVA TASK.

For example, you may have chosen EXTERNAL EVENT as seva. Here you may mention the name of your upasana center, but it is optional. (5A3)
It is compulsory to state the date of commencement and the duration. Otherwise you will not be able to search that seva.

To search, click on the encircled search button as shown in the above figure mentioned as no.1
If your information is correct then you will find the Bhakti seva task you are looking for (5A4).
Single click on BHAKTI SEVA TASK and then click on encircled FILE CURRENCY CLAIM as shown in the figure mentioned. New window will open.


Here you will see all the information that you have filled earlier and below that you will see PERFORMANCE MEASURE option (No.5A5).

Here you have to fill in the details of your Bhakti-Seva. These details will always be in the digits. Note that it is mandatory to fill in the Performance measure details in numbers. For example if you are submitting 10 hanks(laddis), you have to enter only the number 10 (laddis), if you have done seva for one day, then type only the number 1. The measurement of your seva will be seen in a bracket. Before submitting your claim after stating the required quantity or day or hours etc, you can leave your comments if you wish to(No.5 A 6). Comment in short. It is not compulsory to enter a comment.
After that, click on encircled SUBMIT CLAIM button


Your claim will be submitted and this will show in the window saying ‘INFORMATION’.


Now click on CLOSE button to go back to MY REQUESTED CLAIM Page where you will be able to see a table (No.5A7) wherein your claim details will appear.


One important thing to note in this table is-
BHAKTI SEVA TASK- The bhakti-seva you chose to claim the TULSIPATRA will be seen in this column.

UPASANA KENDRA-
You will see the name of the Upasana Kendra where you have performed the Seva or Bhakti.

MEASUREMENTS-
Here you will see the performance measurement of your Seva or Bhakti performed in terms of given quantity. For example, If you have submitted 2 hanks, it will show ‘2 Number of Hanks’  in this column.

BHAKTI SEVA DATE-
You will be able to see the date on which you have performed the Bhakti seva.

REQUEST DATE-
You will see the date on which you have claimed your currency.

STATUS-
You will be able to see the recent status of your claim.

CLAIM STATUS-
On the left hand corner of the table you will see an option of CLAIM STATUS (No. 5A8). Within that you will see 6 more sub- options. They are as follows.
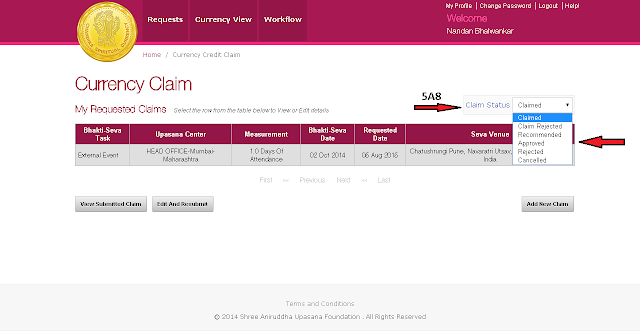

CLAIMED- On clicking this option, you will be able to see your claim request here.

CLAIM REJECTED- If your claim has been rejected then on clicking this option you will be able to see it in the table. When your currency credit claim is rejected by the recommender, then the claim goes to this status. Note that this is level 1 rejection.

RECOMMENDED- It will show if your coordinator at the first level has recommended your claim.

APPROVED- If your claim has been approved at the second level by the CLAIM APPROVER then it will be shown in the table on clicking this option.

REJECTED- If your claim has been rejected at the second level i.e. by claim approver, then it will be shown here. Note that this is level 2 rejection.     

CANCELLED- If your claim has been cancelled completely, then it will be shown here.

 Now if you need to view your claim detail, single click on that line.


Below this you will see 2 buttons. If you click on No. 5A9-VIEW SUBMITED CLAIM, then you will be able to see the complete details of your claim.

Similarly, if you press the button 5A10- EDIT & RESUBMIT, you will only be able to edit your claim; meaning you can change the information.

LOG OUT-
When you are done with CHANDIKA SPIRITUAL CURRENCY WEBSITE, you can click on No.3-LOG OUT. You will return to the home page.

Hari Om      Shreeram      Ambadnya

Powered by Blogger.